

Deep Neural Network from Scratch in Rust 🦀- Part 5- Training and Inference
In the final part of our series, we train and test our neural network model built from scratch in Rust.


Great!! You have made it to the final part of the series. In this part, we will train our model and test it by building a prediction function. Luckily, there is no math involved in this part 😃. So let's get coding.
Training
First we are going to build our training loop which takes in the training data: x_train_data, training labels: y_train_data, the parameters dictionary: parameters, the number of training loop iterations: iterations and the learning_rate. The function will return the new parameters after a training iteration. In impl DeepNeuralNetwork add the following function.
pub fn train_model(
&self,
x_train_data: &Array2<f32>,
y_train_data: &Array2<f32>,
mut parameters: HashMap<String, Array2<f32>>,
iterations: usize,
learning_rate: f32,
) -> HashMap<String, Array2<f32>> {
let mut costs: Vec<f32> = vec![];
for i in 0..iterations {
let (al, caches) = self.forward(&x_train_data, ¶meters);
let cost = self.cost(&al, &y_train_data);
let grads = self.backward(&al, &y_train_data, caches);
parameters = self.update_parameters(¶meters, grads.clone(), learning_rate);
if i % 100 == 0 {
costs.append(&mut vec![cost]);
println!("Epoch : {}/{} Cost: {:?}", i, iterations, cost);
}
}
parameters
}
This function performs the following steps:
It initializes an empty vector called
coststo store the cost values for each iteration.It iterates over the specified number of
iterations.In each iteration:
It performs forward propagation using the
forwardmethod to obtain the final activationaland the caches.It calculates the cost using the
costmethod.It performs backward propagation using the
backwardmethod to compute the gradients.It updates the parameters using the
update_parametersmethod with the computed gradients and the learning rate.If the current iteration is a multiple of 100, it appends the cost value to the
costsvector and prints the current epoch number and cost value.
After the loop, it returns the updated parameters.
Predict
After the training loop is done, we can make a predict function that takes in the test data: x_test_data and the optimized parameters: parameters.
pub fn predict(
&self,
x_test_data: &Array2<f32>,
parameters: HashMap<String, Array2<f32>>,
) -> Array2<f32> {
let (al, _) = self.forward(&x_test_data, ¶meters);
let y_hat = al.map(|x| (x > &0.5) as i32 as f32);
y_hat
}
pub fn score(&self, y_hat: &Array2<f32>, y_test_data: &Array2<f32>) -> f32 {
let error =
(y_hat - y_test_data).map(|x| x.abs()).sum() / y_test_data.shape()[1] as f32 * 100.0;
100.0 - error
}
The predict function performs the following steps:
It calls the
forwardmethod with the test data and the optimized parameters to obtain the final activational.It applies a threshold of
0.5to the elements ofalusing themapmethod, converting values greater than0.5to1.0and values less than or equal to0.5to0.0.It returns the predicted labels as
y_hat.
The score function calculates the accuracy score of the predicted labels compared to the actual test labels. It performs the following steps:
It calculates the element-wise absolute difference between the predicted labels
y_hatand the actual test labelsy_test_data.It sums the absolute differences using the
summethod.It divides the sum by the number of examples (
y_test_data.shape()[1]) and multiplies by100.0to get the error percentage.It subtracts the error percentage from
100.0to get the accuracy score and returns it.
Some Helper functions
Write Parameters to a JSON file
We can define a helper function to write the trained model's parameters to a JSON file. This allows us to save the parameters for later use without requiring retraining.
First in Cargo.toml add this line
serde_json = "1.0.91"
Then in lib.rs import OpenOptions and create the function
//lib.rs

use std::fs::OpenOptions;

pub fn write_parameters_to_json_file(
    parameters: &HashMap<String, Array2<f32>>,
    file_path: PathBuf,
) {
    let file = OpenOptions::new()
        .create(true)
        .write(true)
        .truncate(true)
        .open(file_path)
        .unwrap();

    _ = serde_json::to_writer(file, parameters);
}
This function takes in the parameters and a file path where the JSON file will be created. It opens the file in write mode, truncating any existing content. Then, it uses the serde_json crate to serialize the parameters and write them to the file.
Application Example
To demonstrate the usage of the library, we can create an application that loads the data, trains the model, and tests it. We can create a file named rust_dnn.rs inside the src/bin folder. Here's an example implementation:
use dnn_rust_blog::*;
use std::env;
fn main() {
env::set_var("RUST_BACKTRACE", "1");
let neural_network_layers: Vec<usize> = vec![12288, 20, 7, 5, 1];
let learning_rate = 0.0075;
let iterations = 1000;
let (training_data, training_labels) =
dataframe_from_csv("datasets/training_set.csv".into()).unwrap();
let (test_data, test_labels) = dataframe_from_csv("datasets/test_set.csv".into()).unwrap();
let training_data_array = array_from_dataframe(&training_data)/255.0;
let training_labels_array = array_from_dataframe(&training_labels);
let test_data_array = array_from_dataframe(&test_data)/255.0;
let test_labels_array = array_from_dataframe(&test_labels);
let model = DeepNeuralNetwork {
layers: neural_network_layers,
learning_rate,
};
let parameters = model.initialize_parameters();
let parameters = model.train_model(
&training_data_array,
&training_labels_array,
parameters,
iterations,
model.learning_rate,
);
write_parameters_to_json_file(¶meters, "model.json".into());
let training_predictions = model.predict(&training_data_array, ¶meters);
println!(
"Training Set Accuracy: {}%",
model.score(&training_predictions, &training_labels_array)
);
let test_predictions = model.predict(&test_data_array, ¶meters);
println!(
"Test Set Accuracy: {}%",
model.score(&test_predictions, &test_labels_array)
);
}
We set the neural network layers, learning rate, and number of iterations.
We load the training and test data from CSV files using the
dataframe_from_csvfunction.We convert the dataframes to arrays and normalize the pixel values to the range [0, 1].
We create an instance of the
DeepNeuralNetworkstruct with the specified layers and learning rate.We initialize the parameters using the
initialize_parametersmethod.We train the model using the
train_modelmethod, passing in the training data, training labels, initial parameters, iterations, and learning rate.We write the trained parameters to a JSON file using the
write_parameters_to_json_filefunction.We predict the labels for the training and test data using the
predictmethod.We calculate and print the accuracy scores for the training and test predictions using the
scoremethod.
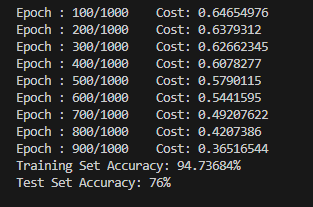
Now, in the terminal, run the following command to install the binary and to run it
cargo install --path && rust_dnn
This will install the dependencies and start the training
Wrap up
Although the dataset used in our example was small and the network architecture was not complex, the purpose of this series was to provide a general workflow and introduce the inner workings of a neural network. With this foundation, you can now expand and enhance the library to handle larger datasets, more complex network architectures, and additional features.
By building this neural network library in Rust, we benefited from the language's safety, performance, and concurrency features. Rust's strong type system and memory safety guarantees help prevent common bugs and ensure code correctness. Additionally, Rust's focus on efficiency and parallelism allows us to leverage multi-threading and take advantage of modern hardware capabilities.
With this library, you now have a powerful tool for developing neural network models in Rust. You can further explore and experiment with different network architectures, activation functions, optimization techniques, and regularization methods to improve the performance of your models.
As you continue your journey in machine learning and deep learning, remember to stay curious, keep exploring new concepts and techniques, and leverage the rich Rust ecosystem to further enhance your neural network library.
GitHub Repository: https://github.com/akshayballal95/dnn_rust_blog.git
Want to connect?